

Before I start the instructions for this quilt let me commence by saying that I am not a quilting/machine embroidery professional. I am not an expert by any means. However, I am passionate about what I do. I am going to share with you some of my techniques and they may not be seen to be best practice by the experts but they work for me.
Quilt Fabric Requirements
1 yd (metre) of 45" (115cm) fabric for plain embroidered quilt blocks
1 yd (metre) of 45" (115cm) contrast fabric (red)
1/3 yd (30cm) of 45" (115cm) contrast fabric (blue)
The finished quilt top measures 42" square so you can decide your binding fabric , backing and batting. I am going to be doing a "faux" piped binding in the blue fabric with a faux piping colour of white.
Preparing your Quilt Fabric to Hoop and Stitching Your Quilt Block
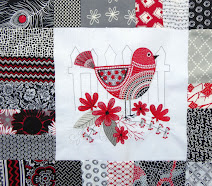
- The first step is to decide just how big you want your finished block to be before piecing.I decided on 8 inch trimmed blocks for this quilt and instructions for the quilt are done according those measurements. This means that to have enough fabric to successfully hoop for embroidering I will cut my squares out at 11-12 inches.
- I always spray my fabric with spray on starch and press it. There are many great products out there. My local discount store has a fabulous product that I use for this purpose and also for my heirloom sewing.

- The next next in the process is to draw cross lines on the fabric lines through the centre of the block both horizontally and vertically with a wash a way marker or chalk.Please only use one that you are happy with as some wash a way markers become permanent if heat is applied. If I am doing something that does not need anything to be too exact I may just lightly press these lines in place. These marked lines become critical for me when squaring up the embroidered quilt block as you will see later.
- When hooping your fabric make sure that it is not too tight in the hoop.
- Hoop your fabric and your preferred stabilizer.
- When embroidering redwork, you may need to decrease the top tension on your embroidery machine to prevent your bobbin thread from showing or alternatively use matching top and bobbin thread.
- Stitch out your design.
- Remove the stabilizer from your design.
- We are now going to trim our blocks to size.
- Line up the centre horizontal line of your design with the 4" line (half of 8") on your ruler, trim along the top. If you were making a 9" block you would line up the 4 1/2" mark n your ruler.


That's it for part 2 of our quilt tutorial. If you have any queries just email me.


 Quilter Blogs & Store Search
No comments:
Post a Comment