


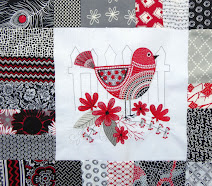
You should now have trimmed your blocks to 8” square
These instructions and measurements are for an 8” (eight ) trimmed block quilt. I will put the measurements for ( 9), (10), (11) and( 12 )inch blocks in brackets beside the original measurements. Hope my maths is OK seeing that I am a maths teacher !
Top and Bottom Block Strips
From the red fabric cut 1 strip 4 ¼ inches
(4 ¾”) (5 ¼”) (5 ¾”) (6 ¼”) x width of the fabric (45 " )
From the blue fabric cut 1 strip 4 ¼ inches
(4 ¾”) (5 ¼”) (5 ¾”) (6 ¼”) x width of the fabric (45 ")
With right sides together stitch the strips together using a 1/4inch seam allowance. It is essential that you use a ¼ seam allowance as my fabric cutting measurements are dependent on that.
Press the seam to one side, making sure that you set the seam before doing so. If you press all your seams towards the same colour throughout the quilt, the seams will interlock nicely when you join the blocks to each other .
 |
| Strip being cut with June Tailor Shape Cut |
Cut the finished 8 inch wide joined strip into 18 x 2" smaller strips. I used the June Tailor Shape Cut with my rotary cutter to make the cutting easy and quick but of course you can just use a rotary cutter and quilter’s rule.
With right sides together, sew one strip to the top and bottom of each block as shown.

In the next tutorial we will add the remaining sections to the blocks and put the quilt top together


 Quilter Blogs & Store Search
No comments:
Post a Comment