

These fabric scissor holders with three pockets are a great way to store your scissors so that they are all in the same place and their tips are not going blunt from being up against your bits of equipment in a drawer etc. If you go to classes you can make a few to keep your rotary cutter, marking pencils, glue sticks and so on.
Once you have mastered the fold you can make them in a few minutes even with embroidery on them. A great quick gift idea especially if you personalise them with a monogram.
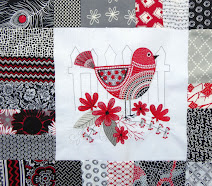
If you are going to put an embroidery on your scissor holder it is a good idea to draw up your pattern on a piece of paper and make the folds in that before you start embroidering so that you know your design is in the correct place. This will also give you a good feel as to the size and shape of any embroidery design you may want to use. Mine could have been over a little more towards the centre.
By just making them a smidge smaller you could get a holder out of two layer cake squares that you may have left over from a project.
Requirements
Two (2) pieces of fabric that will be cut to 8 ¾” x 10 ¼” (Do not cut them yet if you are going to embroider one of them) I have used a plain colour for the front and a coordinating print for the back.
One (1) piece of iron on pellon the same size as your cut fabric pieces
Construction
- Draw the 8 ¾” x 10 ¼ “ rectangle on your top (plain) fabric with a pencil or marking pencil . If you wish to embroider it do not cut it out as it is easier to hoop in the bigger piece.
- Mark where your design needs to go.
- Embroider your design
- Cut your rectangle of fabric out
- Cut your contrast fabric out
- Iron your piece of pellon to the wrong side of the floral fabric
- With right sides together and using a ¼” seam allowance , stitch around the two rectangles leaving about a 2” gap on the long side opposite the embroidery to turn. This side gets tucked in so is the perfect place to leave the opening for turning.
 Trim your seams back making sure that you make small diagonal cuts across the corners as shown above.
- Turn through the opening and press well making sure the points are pulled out well
- You should now have a piece like the one below. I have already done a practice fold and that is why the creases are in mine.


11. Pick up the corner of your scissor holder closest to the monogram and fold it over to align with the longer edge as shown below

12. Now turn the shorter edge with the monogram back to meet the diagonal fold on the right

13. Take the long edge on the left (with the turning hole in it) and tuck it in under the folded back monogram piece on the right

14. Your scissor holder should now look like this. You may need to go back and redo your folds, pressing with the iron as you go. When you are satisfied with your folding, and with your stitch length about 3.00, stitch along the side edges of your scissor holder to keep your folds in place. It is a good idea to start stitching about 1/4" below the edge on the right, sew a few stitches and then reverse or back stitch to the beginning of the fold. That way you do not end up with a bunched up mess under your machine foot. I started up near the monogram on the right hand side, stitched down to the point at the bottom and then up the other side.
15. You could always add a piece of ribbon or make a rouleau loop to act as a hanger and put in the corner (the one above the monogram)before you stitch your scissor holder together.

Enjoy!


 Quilter Blogs & Store Search
Very cute Vicki. My friend sent me to check this out.
ReplyDeleteWhat a great Idea! I have just bought myself some really good dressmaking shears and I will adapt this idea to keep them safe. Thanks Vicki.
ReplyDeleteI'm still learning from you, as I'm improving myself. I certainly enjoy reading everything that is written on your site.Keep the tips coming. I enjoyed it!
ReplyDelete03-09 SUZUKI LTZ400: MAIER ATV HANDGUARDS
This comment has been removed by the author.
ReplyDeleteI just made a scissor holder, thanks
ReplyDeleteThis is gorgeous and so useful
ReplyDeleteGiving this a go this evening :)
ReplyDeleteThanks so much!! I have only had one lesson and still learning how to use my machine, but this one seemed doable and i did it!!
ReplyDeleteThank you for these very easy to follow instructions. I added a grommet so I could hang it from a hook. With a ribbon, I could also hang it around my neck so my sewing tools would be close at hand.
ReplyDeleteSuch a wonderful idea! Thank you!
ReplyDeleteGracias todo muy lindo
ReplyDelete