
 |
| Mum's Apron |


I am sharing a picture of one of my mother's aprons that she makes. My Mum is 76 and has always been a fantastic sewer, knitter, crocheter and embroiderer.This apron was made about 20 years ago for a show and has never been used. The sewing is flawless and she did not use a binding foot to put the binding on. She has been making this style of apron for as long as I can remember and I am nearly 55. As a child we lived in a very small rural community and I attended a primary school with only 6 in my class. The school and local Anglican church used to have annual fairs as fundraisers and Mum would make many of this apron style to sell. The fabric donated by a manufacturer in Hobart used to arrive by mail in a brown paper parcel.
This apron style is perfect to put machine embroidery on, decorate with ric rac etc. You are limited only by your imagination.
To save the picture of the pattern, click on the pattern until the large version shows , right click -save as-choose where you want to save it
 |
| Apron Pattern |
5/8inch (1.5cms)seams are used throughout
1. Cut out the main apron section (25 inches x 15 1/2 inches)and also the contrast pocket strip along the bottom (25 inches x 8 inches)
2. Place the contrast strip on top of the main section with the bottom and side edges lined up evenly
3. Using a glass or lid off a jar ,trace around the corners of the apron and pocket to give you the curved edge.
4.Apply the bias strip to the long straight edge of the contrast pocket strip
5. Pin the pocket section to the main apron section
6.Cut out the two pocket tabs (9 1/2 inches x 2 1/2 inches).Use the jar or lid again to make the tops of the pocket tabs rounded.
7.Stitch the bias around the pocket tabs
8. Position the pocket tabs over the pinned apron sections.
9. Topstitch in place
10. Apply the bias around the side and bottom edges of the apron.
11. Cut out the two strap pieces ( 20 inches x 4 1/2 inches). With right sides together sew along the long edges of the two straps, tapering off to to a diagonal at the bottom
12. Trim your strap seams and turn through. Press well
13.Gather the top of the apron to fit the waistband, you can gather all the way across or just have two gather sections to the side as in this apron.
14.With right sides together sew one edge of the waistband to the apron skirt section
15. Stitch the ties to the sides of the waistband
16.Sew the side edges of the waistband, making sure that the ties are folded in towards the middle
17. Fold under 5/8 seam allowance on the waistband and handstitch to the inside of the apron
Enjoy making the apron. You are more than welcome to use this pattern for fund raising etc. Please do not publish the pattern and instructions elsewhere without my permission. Direct your friends to my blog.
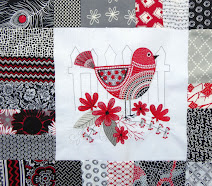
Coming Soon - a quilt layout to use our machine embroideries
Coming Soon - a quilt layout to use our machine embroideries


 Quilter Blogs & Store Search
Thank you Vicki for posting this apron pattern. I've never seen an apron like this and I will be trying to make it soon.
ReplyDelete